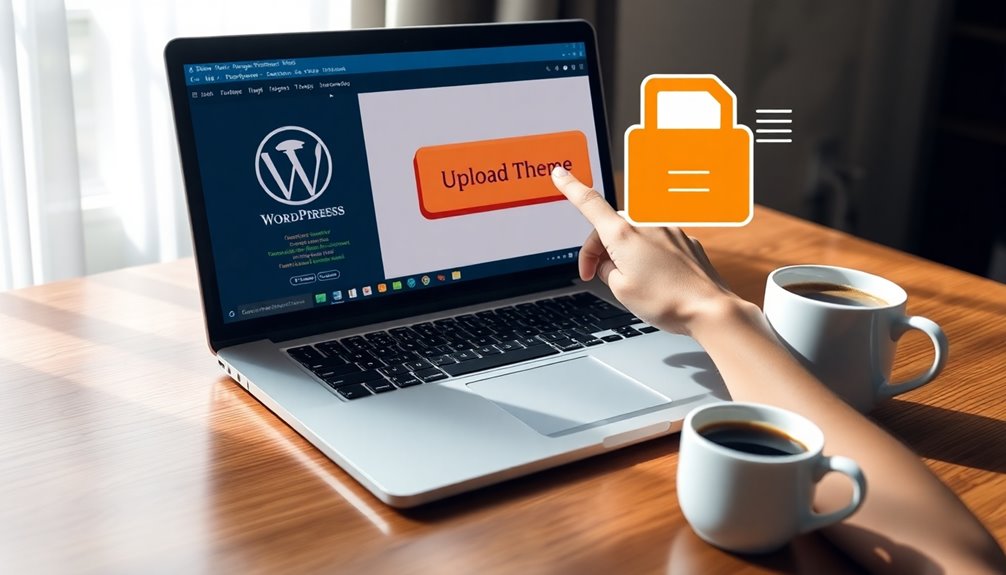
To install a WordPress theme from a ZIP file, first log into your WordPress dashboard. Navigate to Appearance > Themes, then click “Add New” and select “Upload Theme.” Choose your ZIP file and hit “Install Now.” Once uploaded, click “Activate” to set your new theme live. Make sure to customize it to fit your vision. If you want to explore more about managing themes and troubleshooting issues, there’s plenty more to uncover!
Why Install a WordPress Theme From a ZIP File?
Why should you install a WordPress theme from a ZIP file? Using a ZIP file streamlines your theme selection process and offers flexibility.
When you download a theme as a ZIP, you get all the necessary files bundled together, making installation quick and hassle-free. This format supports various customization options, allowing you to easily modify the theme to fit your site’s needs.
Plus, many premium themes are only available in ZIP format, giving you access to high-quality designs that can enhance your website’s appearance and functionality. Additionally, themes like Astra’s performance can significantly improve your site’s loading speed and overall user experience.
What You Need Before Installing a Theme
Before you install a WordPress theme, you’ll need to verify your site meets the basic requirements. It’s also essential to check if the theme is compatible with your current setup. Having these points sorted out will make the installation process much smoother. Additionally, ensuring that your hosting plan includes managed WordPress hosting can significantly enhance your site’s performance and security during the installation process.
Basic WordPress Requirements
To successfully install a WordPress theme, you need to meet a few basic requirements.
First, verify you’ve got a self-hosted WordPress site, as themes can’t be installed on WordPress.com without a Business plan.
Familiarize yourself with WordPress basics, like accessing your dashboard. You’ll also need to choose a theme that meets the theme essentials for your website’s purpose.
Check that your site runs on updated PHP and MySQL versions, as outdated software can cause issues during installation.
Additionally, have a reliable internet connection while downloading and uploading your theme.
Theme Compatibility Check
Ensuring your chosen theme is compatible with your version of WordPress is essential for a hassle-free installation. Before you proceed, check the theme’s documentation or the marketplace listing for compatibility details.
Look for recent theme updates, as these often indicate active support and alignment with the latest WordPress features.
Also, consider plugin compatibility; some themes work better with specific plugins. If you plan to use popular plugins for SEO, caching, or e-commerce, verify that your theme supports them to avoid conflicts.
It’s a good idea to read user reviews too, as they can provide insights into any compatibility issues others have faced.
How to Access Your WordPress Dashboard
Accessing your WordPress dashboard is a straightforward process that sets the stage for customizing your site. First, open your web browser and enter your site’s URL, adding “/wp-admin” at the end. You’ll be prompted to enter your username and password.
Once logged in, you’ll see the dashboard, which is your control center. Familiarize yourself with Dashboard overview essentials like the main menu on the left, where you can access posts, pages, and settings.
Use WordPress navigation tips to streamline your experience—consider pinning frequently used sections. This dashboard is your gateway to enhancing your site’s design and functionality, so take a moment to explore its features. Additionally, remember that installing WordPress correctly is crucial for a seamless experience moving forward.
Steps to Upload a Theme ZIP File
While your theme is uploading, remember these theme installation tips: verify the theme is compatible with your version of WordPress and check user reviews for reliability. Once the upload finishes, you’ll see a success message. Choosing themes that reflect your brand can greatly impact your site’s aesthetics, so take your time to select one that resonates with your vision. Additionally, be sure to stay informed about continuous theme updates to maintain security and functionality.
Activating Your New WordPress Theme
Now that you’ve uploaded your new theme, it’s time to activate it.
You’ll need to access the theme settings to make it live on your site. From there, you can customize the appearance options to match your vision. Additionally, consider implementing performance optimization techniques to ensure your site runs smoothly after activation.
Access Theme Settings
Once you’ve installed your new WordPress theme, activating it’s the next essential step to bring your site to life. To do this, head over to your WordPress dashboard and click on “Appearance,” then select “Themes.” You’ll see your newly installed theme here.
Simply click the “Activate” button, and your theme will be live on your site.
Now that your theme is active, you can access the theme settings for further adjustments. Look for the “Customize” option under the Appearance menu.
This is where you can explore theme customization, making design adjustments to suit your brand. Explore different features like header images, color schemes, and typography to create a unique look for your site.
Customize Appearance Options
Customizing your WordPress theme’s appearance options can truly transform your site’s look and feel.
Once you’ve activated your new theme, head to the customization section under the Appearance menu. Here, you can explore various layout options that suit your content best.
Whether you prefer a grid layout or a single-column design, you’ll find choices that enhance usability and aesthetics.
Don’t forget to experiment with color schemes; they can greatly impact your site’s mood and branding.
Adjust header colors, background shades, and text hues to create a cohesive look.
As you make changes, preview them in real-time, ensuring everything aligns with your vision.
When you’re satisfied, save your settings to make your site uniquely yours!
Customizing Your Theme Settings
Immerse yourself in your theme settings to access a world of customization options that can transform your website’s appearance and functionality.
Start by exploring the theme aesthetics, focusing on color schemes and typography choices that align with your branding consistency.
Explore theme aesthetics by selecting color schemes and typography that harmonize with your brand for a cohesive visual identity.
Utilize design flexibility to create responsive layouts that enhance user experience across devices.
Check out widget integration for adding dynamic content, making your site more interactive. Effective widget use can significantly enhance site speed and overall performance.
Experiment with layout variations to find the best structure for your content.
Each adjustment you make can profoundly impact how visitors perceive your site, so take your time to find the perfect balance that reflects your vision.
With these tools, you’ll create a unique online presence that stands out.
Troubleshooting Theme Installation Issues
When installing a WordPress theme, you might run into some common error messages that can be frustrating. It’s also important to check for file size limitations that could prevent your theme from uploading. Let’s address these issues so you can get your theme up and running smoothly. Additionally, memory limit errors can exacerbate installation problems, so it’s essential to monitor server settings.
Common Error Messages
Have you ever encountered frustrating error messages while trying to install a WordPress theme? You’re not alone. Common mistakes like uploading the wrong file type or exceeding server limits can lead to error troubleshooting headaches.
For instance, if you see a “The package couldn’t be installed” message, double-check that you’re uploading the correct ZIP file.
Another frequent issue is the “Theme is missing the style.css stylesheet” error, which usually means the ZIP file contains an extra folder.
Don’t forget to verify that your WordPress version is compatible with the theme.
File Size Limitations
Error messages can often stem from issues like file size limitations. When you try to upload a theme, your hosting provider may impose upload limitations that prevent larger theme files from being installed.
If you encounter an error, check the theme size to verify it fits within your server’s upload limits.
To resolve this, you might need to increase the maximum upload size in your php.ini file or .htaccess file. Alternatively, you can contact your hosting provider for assistance.
If all else fails, consider using a different method to install your theme, like FTP, which bypasses these upload limitations entirely.
Keep these tips in mind, and you’ll be on your way to a successful theme installation.
Deleting an Unused Theme Safely
Deleting an unused theme is a straightforward process that can help streamline your WordPress site.
First, log into your WordPress dashboard and navigate to “Appearance” and then “Themes.” Here, you’ll see all the themes currently installed.
Identify the theme you want to remove and hover over it. Click on “Theme Details,” and then you’ll find the option for “Delete” in the bottom right corner. Confirm the deletion.
This safe deletion guarantees that your site isn’t bogged down by unnecessary themes, aiding in effective theme management. Regular theme management also contributes to site security and overall performance.
Remember, you can only delete themes that aren’t currently active, so switch to another theme first if needed.
Regularly managing your themes keeps your site efficient and secure.
How to Preview Your Theme Before Activation?
Wondering how your new theme will look on your site before making it live? You can easily check its appearance using the live preview feature.
Most themes offer a theme demo that showcases their layout variations and color schemes. Once you’ve uploaded your ZIP file, click on “Live Preview” to see how it integrates with your content.
This tool allows you to explore customization options, ensuring it meets your needs. Don’t forget to run functionality tests to verify widget support and responsive design on various devices. Additionally, popular themes like OceanWP often provide starter templates for quick setup.
Additionally, check user reviews for insights on performance. Following these installation tips will help you feel confident about activating your theme when you’re ready!
Understanding Theme Compatibility Requirements
Before you immerse yourself in installing a new WordPress theme, it’s vital to understand its compatibility requirements to guarantee a smooth integration with your site.
Start by checking the theme requirements listed by the developer. Verify your WordPress version and PHP settings align with those specifications.
Compatibility issues can arise if your current plugins or customizations conflict with the new theme.
It’s also important to reflect on your design preferences and functionality needs; some themes may prioritize aesthetics while others focus on features.
By thoroughly evaluating these factors, you can avoid potential headaches and ensure that your new theme enhances your site’s performance, rather than hindering it. Additionally, consider reviewing user reviews and ratings to gauge the theme’s reliability and compatibility with your existing setup.
Take the time to choose wisely for a seamless change.
Exploring Free vs. Premium WordPress Themes
Choosing the right theme also involves weighing the benefits of free versus premium options. Free themes can be a great starting point, especially if you’re on a budget. They often come with basic features and can be sufficient for simple sites.
However, premium themes usually offer more robust options and support.
Consider these points:
- Customization: Premium themes often allow more design flexibility.
- Support: With premium options, you typically get dedicated customer support.
- Updates: Premium themes usually receive regular updates, enhancing security and features.
Ultimately, free theme benefits can be appealing, but premium theme features might better serve your long-term goals.
Evaluate your needs to make the best choice for your WordPress site!
Best Practices for Choosing a WordPress Theme
When it comes to selecting a WordPress theme, what should you prioritize to confirm it aligns with your site’s goals? First, assess theme aesthetics to verify it resonates with your brand.
Focus on user experience by choosing themes with a functionality focus and responsive design, so your site looks great on all devices.
Prioritize user experience by selecting themes that emphasize functionality and responsive design for optimal viewing on all devices.
Don’t overlook performance speed, as a fast site enhances engagement.
Check for SEO considerations, confirming the theme supports optimization.
Look for customization flexibility to tailor the theme to your needs, and review demo content to gauge its potential.
Finally, consider support options and update frequency; a reliable theme with regular updates keeps your site secure and functioning well.
Frequently Asked Questions About Theme Installation
Have questions about installing your WordPress theme? You’re not alone! Many users run into similar issues.
Here are some common mistakes to avoid and theme installation tips to keep in mind:
- Forgetting to activate the theme: After installation, don’t forget to activate it in the Appearance section.
- Ignoring compatibility: Always check if your theme is compatible with your version of WordPress and other plugins.
- Skipping demo content: If your theme offers demo content, consider importing it to see how your site can look.
Conclusion
Now that you know how to install a WordPress theme from a ZIP file, you’re ready to give your site a fresh look. Remember, “Don’t put all your eggs in one basket.” Explore different themes to find the perfect fit for your vision. As you navigate this process, trust your instincts and enjoy the creativity that comes with customizing your website. Happy theming, and may your site shine bright in the vast digital landscape!